반응형


소프트웨어 렌더링을 이용한 엔진을 만드는 내용을 담은 책이다.


소프트웨어 렌더링을 이제 본격적으로 만드려고 하는데 


수학 라이브러리 만들기, 엔진 구성등등 꽤 다양한 내용이 있어서 도움이 될 것 같다.


읽고 적용할 만한 것이나 도움이 될 만한 것들은 포스팅 하도록 하겠다.

반응형
Posted by msparkms
,
반응형


원본 : http://en.wikipedia.org/wiki/Cohen%E2%80%93Sutherland_algorithm


선 클리핑 알고리즘인 Cohen–Sutherland algorithm.


선을 그릴때 화면을 벗어났는지 체크하고 벗어났으면 화면 끝으로 점의 위치를 맞춰주는 알고리즘.


소프트웨어 렌더링을 할때 자주 사용된다.


Wiki에 정리가 잘 되어 있어서 올린다.


Cohen–Sutherland algorithm

From Wikipedia, the free encyclopedia

In computer graphics, the Cohen–Sutherland algorithm (named after Danny Cohen and Ivan Sutherland) is a line clipping algorithm. The algorithm divides a 2D space into 9 regions, of which only the middle part (viewport) is visible.

In 1967, flight simulation work by Danny Cohen led to the development of the Cohen–Sutherland computer graphics two and three dimensional line clipping algorithms, created with Ivan Sutherland.[1]

Contents

  [hide

[edit]The algorithm

The algorithm includes, excludes or partially includes the line based on where:

  • Both endpoints are in the viewport region (bitwise OR of endpoints == 0): trivial accept.
  • Both endpoints are on the same non-visible region (bitwise AND of endpoints != 0): trivial reject.
  • Both endpoints are in different regions: In case of this non trivial situation the algorithm finds one of the two points that is outside the viewport region (there will be at least one point outside). The intersection of the outpoint and extended viewport border is then calculated (i.e. with the parametric equation for the line) and this new point replaces the outpoint. The algorithm repeats until a trivial accept or reject occurs.

The numbers in the figure below are called outcodes. An outcode is computed for each of the two points in the line. The first bit is set to 1 if the point is above the viewport. The bits in the outcode represent: Top, Bottom, Right, Left. For example the outcode 1010 represents a point that is top-right of the viewport. Note that the outcodes for endpoints must be recalculated on each iteration after the clipping occurs.


100110001010
000100000010
010101000110

The Cohen–Sutherland Algorithm can be used only on a rectangular clipping area . For other convex polygon clipping windows, use Cyrus–Beck Algorithm.

[edit]Example C/C++ implementation

typedef int OutCode;
 
const int INSIDE = 0; // 0000
const int LEFT = 1;   // 0001
const int RIGHT = 2;  // 0010
const int BOTTOM = 4; // 0100
const int TOP = 8;    // 1000
 
// Compute the bit code for a point (x, y) using the clip rectangle
// bounded diagonally by (xmin, ymin), and (xmax, ymax)
 
// ASSUME THAT xmax , xmin , ymax and ymin are global constants.
 
OutCode ComputeOutCode(double x, double y)
{
        OutCode code;
 
        code = INSIDE;          // initialised as being inside of clip window
 
        if (x < xmin)           // to the left of clip window
                code |= LEFT;
        else if (x > xmax)      // to the right of clip window
                code |= RIGHT;
        if (y < ymin)           // below the clip window
                code |= BOTTOM;
        else if (y > ymax)      // above the clip window
                code |= TOP;
 
        return code;
}
 
// Cohen–Sutherland clipping algorithm clips a line from
// P0 = (x0, y0) to P1 = (x1, y1) against a rectangle with 
// diagonal from (xmin, ymin) to (xmax, ymax).
void CohenSutherlandLineClipAndDraw(double x0, double y0, double x1, double y1)
{
        // compute outcodes for P0, P1, and whatever point lies outside the clip rectangle
        OutCode outcode0 = ComputeOutCode(x0, y0);
        OutCode outcode1 = ComputeOutCode(x1, y1);
        bool accept = false;
 
        while (true) {
                if (!(outcode0 | outcode1)) { // Bitwise OR is 0. Trivially accept and get out of loop
                        accept = true;
                        break;
                } else if (outcode0 & outcode1) { // Bitwise AND is not 0. Trivially reject and get out of loop
                        break;
                } else {
                        // failed both tests, so calculate the line segment to clip
                        // from an outside point to an intersection with clip edge
                        double x, y;
 
                        // At least one endpoint is outside the clip rectangle; pick it.
                        OutCode outcodeOut = outcode0? outcode0 : outcode1;
 
                        // Now find the intersection point;
                        // use formulas y = y0 + slope * (x - x0), x = x0 + (1 / slope) * (y - y0)
                        if (outcodeOut & TOP) {           // point is above the clip rectangle
                                x = x0 + (x1 - x0) * (ymax - y0) / (y1 - y0);
                                y = ymax;
                        } else if (outcodeOut & BOTTOM) { // point is below the clip rectangle
                                x = x0 + (x1 - x0) * (ymin - y0) / (y1 - y0);
                                y = ymin;
                        } else if (outcodeOut & RIGHT) {  // point is to the right of clip rectangle
                                y = y0 + (y1 - y0) * (xmax - x0) / (x1 - x0);
                                x = xmax;
                        } else if (outcodeOut & LEFT) {   // point is to the left of clip rectangle
                                y = y0 + (y1 - y0) * (xmin - x0) / (x1 - x0);
                                x = xmin;
                        }
 
                        //NOTE:*****************************************************************************************
 
                        /* if you follow this algorithm exactly(at least for c#), then you will fall into an infinite loop 
                        in case a line crosses more than two segments. to avoid that problem, leave out the last else
                        if(outcodeOut & LEFT) and just make it else*/
 
                        //**********************************************************************************************
 
                        // Now we move outside point to intersection point to clip
                        // and get ready for next pass.
                        if (outcodeOut == outcode0) {
                                x0 = x;
                                y0 = y;
                                outcode0 = ComputeOutCode(x0, y0);
                        } else {
                                x1 = x;
                                y1 = y;
                                outcode1 = ComputeOutCode(x1, y1);
                        }
                }
        }
        if (accept) {
               // Following functions are left for implementation by user based on his platform(OpenGL/graphics.h etc.)
               DrawRectangle(xmin, ymin, xmax, ymax);
               LineSegment(x0, y0, x1, y1);
        }
}

[edit]Notes

  1. ^ Principles of Interactive Computer Graphics p.124 and p.252, by Bob Sproull and William M. Newman, 1973, McGraw–Hill Education, International edition, ISBN 0-07-085535-8

[edit]See also

Algorithms used for the same purpose:

[edit]References

[edit]External links


반응형
Posted by msparkms
,
반응형
반응형
Posted by msparkms
,
반응형
Bresenham 알고리즘은 선 그리기를 할 때 내가 이번에 그릴 선이 어디 위치에 있는지 구하려면 실수 연산이 필요한데

이를 정수연산으로만 끝낼 수 없을까에서 나온 알고리즘이다.

실수연산이 정수연산에 비해서 매우 느린 것도 이유가 되고 어차피 화면에 그려질 때도 정수단위의 픽셀에 그려지기 때문에

정수연산만으로 처리하는 것이 더 좋다.

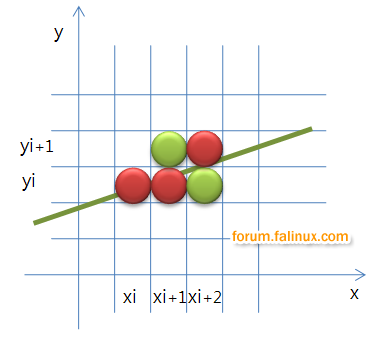
x의 변화량이 y의 변화량 보다 크다면


위와 같은 그림으로 그려지게 될 텐데 xi와 xi + 1까지는 y값이 yi에 더 가깝기 때문에 yi에 점이 그려지고

xi + 2때는 y값이 yi + 1에 더 가깝기 때문에 yi + 1에 그려져야 나름 부드럽게 보이는 선이 만들어지게 된다.


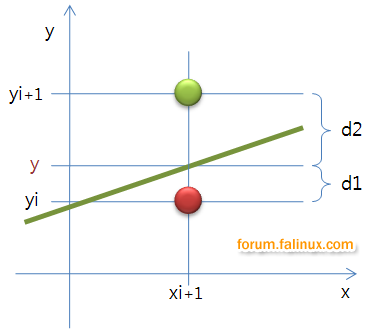
방정식에 의해 나온 y값이 정수값인 yi와 yi+1중 어디에 가까운지 판단하는 것 부터 아이디어를 뻗어나가면 된다.

위에 그림처럼 d1과 d2값을 구해 더 차이가 적은 쪽을 선택하면 된다.


직선의 방정식 : mx + b ( m은 기울기, b는 y절편 ) m = dy/dx

d1 = m(xi+1) + b - yi
d2 = (yi+1) - m(xi+1) - b

계산 한번으로 어디에 가까운지 판단하기 위해서 위 두 식을 합친다.

d1 - d2를 구해 이 값이 0보다 작다면 d1이 작다는 의미로 판단할 수 있고 0보다 크다면 d2가 더 작다는 것을 알 수 있다.

d1 - d2 = m(xi+1) + b - yi - ((yi+1) - m(xi+1) - b)
             = m(xi+1) + b - yi - (yi+1) + m(xi+1) + b
             = 2m(xi+1) + 2b - 2yi - 1

식을 x와 y값을 이용해서만 계산할 수 있게 하기위해 m = dy/dx를 넣어 정리해 준다.

d1 - d2 = 2(dy/dx)(xi+1) + 2b - 2yi - 1
          
해당 값의 부호만 판단하면 되기 때문에 굳이 코스트가 많이 드는 나누기 연산을 할 필요가 없다.

따라서 dx를 양변에 곱해준다.

dx(d1 - d2) = 2(dy)xi + 2dy + 2b(dx) - 2(dx)yi - dx

b, dx, dy값은 변화하지 않는 상수이므로 한번만 계산하면 된다.

위 식을 다시 이쁘게 정리해보자.

dx(d1 - d2) = 2(dy)xi - 2(dx)yi + 2dy - dx + 2b(dx)
                    = 2(dy)xi - 2(dx)yi + 2dy + dx(2b - 1)

위에 빨간색으로 밑줄친 부분은 선을 긋겠다고 마음 먹은 시점에 dx, dy, b값을 알 수 있기 때문에

계산을 하고 한 변수에 넣어 두면 된다. 식에서도 보기 쉽게 C로 정리하겠다.

dx(d1 - d2) = 2(dy)xi - 2(dx)yi + C


일단 1차적인 공식은 끝이 났다.

브레젠함 알고리즘은 이전 값을 이용하여 다음 값을 찾는 형식으로 루프를 돌게 되어있다.

이전 값을 Pi라 하고 그 이후의 값을 Pi+1이라 하자.

Pi    = 2(dy)xi - 2(dx)yi + C
Pi+1  = 2(dy)xi+1 - 2(dx)yi+1 + C

이전 Pi값에 계속 값을 더해주어서 다음 값을 찾는 방법을 이용하기 때문에

더해주어야 되는 값을 구하기 위해 Pi+1 에서 Pi 를 빼보자.

Pi+1 - Pi = 2(dy)xi+1 - 2(dx)yi+1 + C - 2(dy)xi + 2(dx)yi - C
              = 2(dy)(xi+1 - xi) - 2(dx)(yi+1 - yi) 

지금은 dx가 dy보다 크다고 가정을 한 상태에서 식을 세우고 있기 때문에

xi+1 - xi = 1 이 된다. (무조건 한 칸씩 옆으로 가니까)

대신 y값은 이전과 같은 점일 수도 있고 한 칸 움직인 점일 수도 있다.

그렇기 때문에 위의 식에서 부터 두 가지 경우에 대한 식으로 정리할 수 있다.

1. yi+1 - yi = 0 일때 : 2(dy)              -> Pi+1 = Pi + 2(dy)
2. yi+1 - yi = 1 일때 : 2(dy) - 2(dx)    -> Pi+1 = Pi + 2(dy) - 2(dx)

이를 통해 다음 P값을 구할 수 있는 식을 구하게 되었다.

조건에 의해서 두 식중 알맞는 식을 골라서 사용해 나아가면 된다.

이런 점화식을 적용하기 위해서는 처음 값을 알아야 그 뒤부터 적용이 가능하다.

지금의 상황의 경우에는 처음 점을 (X1, Y1)으로 두고 그 다음 점을 (X1 + 1, Y1 + 1/2) 로 두고

구해내면 된다. (x는 1씩 증가하지만 y는 어떻게 될 지 모르기 때문에 절반 값을 넣어 줌)

위 점화식에 넣고 구해보면 최종적으로 처음 점은

P0 = 2(dy) - (dx)가 나온다.

지금까지 나온 값들을 적용해서 코드로 변경하면 된다.


참고 : http://forum.falinux.com/zbxe/?mid=graphic&page=3&document_srl=406146&listStyle=&cpage

위 사이트에 정리가 잘 되어 있어서 올립니다.

이 사이트에서 사용한 그림들도 위 사이트에서 사용한 그림을 이용하였습니다.

문제가 된다면 삭제하겠습니다.


반응형

'프로그래밍 > 소프트웨어 렌더링' 카테고리의 다른 글

Cohen–Sutherland algorithm_Wiki  (0) 2012.08.16
소프트웨어 렌더링 공개 소스 코드  (0) 2011.08.17
Clear함수 구현  (0) 2011.05.17
시작하기  (0) 2011.05.16
소프트웨어 렌더링 참고 링크  (0) 2011.05.13
Posted by msparkms
,
반응형

비트맵에 렌더링을 할 때 이전에 그린 부분을 지워주고 다시 그리기 위해 Clear란 함수를 만든다.

일반적으로 게임을 만들때는 화면에 Clear해주는 배경색은 보이지 않는다.

하지만 Dx에서도 배경색을 설정하는 부분은 있으니 따라서 만들겠다.

일단 간단하게 생각해 볼 수 있는 것은 비트맵 사이즈만큼 루프를 돌면서 각각 픽셀을 원하는 색으로 칠해주는 것이다.

for (int y = 0; y < height_; ++y)
{
    for (int x = 0;x < width_; ++x)
    {
          //SetPixel(x, y, color);
          bits_[y * width_ + x] = color;
     }
 }

매 프레임마다 이런식으로 처리하게 되면 매우 느려진다. 처음에 테스트 삼아 이런식으로 구현해 봤는데

아무것도 안 그리고 Clear() 만 하는데도 FPS가 어마어마하게 떨어졌었다.

배열을 빨리 초기화해 주는 방법으로는 메모리 함수를 이용하는 것이 좋다.

memset()이나 memcpy()와 같은 함수들 말이다.

기존에 만들어진 memset()의 경우에는 1바이트 단위로 처리가 되기 때문에 현재 4바이트를 사용하는 비트맵을 초기화는

하지 못한다. (대신 검은색은 모든 바이트가 0이므로 가능하다.)

g-matrix소스를 참고 하니 위에 한줄을 갱신하고 각 줄마다 memcpy()를 이용하여 복사하는 구문이 있어서 사용해 봤는데

많은 속도 개선이 있었다.

for (int x = 0; x < width_ ; ++x)
{
     bits_[x] = color;
}

for (int y = 1; y < height_ ; ++y)
{
    memcpy(&(bits_[y * width_]), &(bits_[0]), sizeof(DWORD) * width_);
}

개인적인 생각으로는 어셈에 익숙해 지면 4바이트를 복사하는 memset() 함수를 만들 수 있을 것 같다.

일단 이 Clear() 함수를 사용하고 나중에 수정할 수 있으면 수정하겠다.

반응형
Posted by msparkms
,
반응형


소프트웨어 렌더링을 구현하기 위해 처음으로 시작해야 할 것은 소프트웨어 렌더링을 할 환경을 만드는 일이다.

나는 비트맵 하나를 생성하고 비트맵에 렌더링을 한 뒤 최종적으로 Bitblt()을 통해 DC에 그려주는 식으로 만들었다.

비트맵을 관리하는 DIBSection이라는 클래스를 하나 만들고 사이즈와 비트맵이 그려질 DC를 넘겨주면

생성되는 식으로 만들었다.

그려줄 때는 비트맵이 그려질 DC에 비트맵과 연결된 메모리 DC를 그려주면 된다.

BitBlt(screenDC_, 0, 0, width_, height_, memoryDC_, 0, 0, SRCCOPY);

생성시에는 BITMAPINFO 구조체에 값을 설정하고 CreateDIBSection()함수를 통해 생성하였다.

BITMAPINFO bmInfo;

ZeroMemory(&bmInfo, sizeof(BITMAPINFO));

bmInfo.bmiHeader.biSize    = sizeof(BITMAPINFOHEADER);
bmInfo.bmiHeader.biWidth   = width_;
bmInfo.bmiHeader.biHeight   = -height_;     // 위에서 아래로 가는 좌표계로 사용하기 위해
bmInfo.bmiHeader.biPlanes   = 1;
bmInfo.bmiHeader.biBitCount   = DEFAULT_BPP; // 32비트로 만듦
bmInfo.bmiHeader.biCompression  = BI_RGB;    
bmInfo.bmiHeader.biSizeImage  = 0;
bmInfo.bmiHeader.biXPelsPerMeter = 0;
bmInfo.bmiHeader.biYPelsPerMeter = 0;
bmInfo.bmiHeader.biClrUsed   = 0;
bmInfo.bmiHeader.biClrImportant  = 0;

bitmap_ = CreateDIBSection(memoryDC_, (BITMAPINFO *)&bmInfo, DIB_RGB_COLORS, (VOID **)&bits_, NULL, 0);

이후부터는 레스터라이저와 같은 클래스를 만들고 bits_ 배열에 접근하여 비트맵을 수정하면 된다.

bits_[y * width_ + x] = color;

다음에는 브레젠함 알고리즘을 이용한 선 그리기에 대해서 정리하겠다.

반응형
Posted by msparkms
,
반응형


참고 사이트

http://www.devmaster.net/articles.php - 소프트웨어 렌더링 뿐만 아니라 다양한 아티클들이 있음.

공개 엔진
http://www.g-matrix.pe.kr/            - 소프트웨어 렌더링 코드가 공개되어 있는 유명한 사이트
http://www.codeplex.com/Coco3D - 2D 라이브러리도 있던데 3D 라이브러리도 만들었나 봅니다.

지속적으로 추가할 예정..

반응형
Posted by msparkms
,